 Ryan
Ryan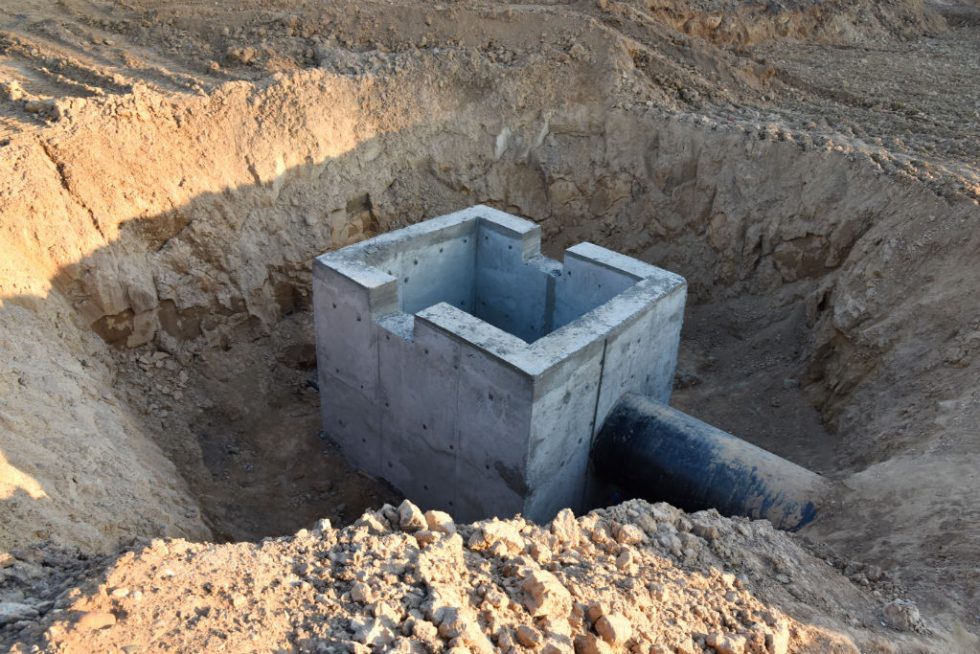
No idea what a stormwater pit is? It’s actually a very simple concept: it’s just a storage area for stormwater. Don’t forget, while you may not give a lot of thought to your stormwater, an awful lot of it – millions of litres, in fact – can flow off your roof, into your gutters & downpipes, and into whatever stormwater drainage solutions you have in place.
How does a stormwater pit work? Again, it’s simple: To enable the temporary storage of stormwater when the skies are open and the flow is mighty, a stormwater pit is designed to hold the water long enough for the drainage pipes to catch up.
And that’s it: stormwater pits in a nutshell! But did you know there are actually quite a few different stormwater pit types?:
- Pre-cast: They’re ready to hook up to reinforced concrete pipes thanks to the ‘knock-out’ sections – parts you can break open with a hammer.
- GRC: Standing for glass-reinforced concrete, these are lighter and easier to install.
- Side-entry: The ones you see built into the side of the streets.
- Custom: Some manufacturers (and very handy people!) create their own stormwater pits with the precise specifications and characteristics they require.
Can you install your own stormwater pits?
Got stormwater pit installation on your mind? The best stormwater pits are made of concrete, which the keen do-it-yourself-er is unlikely to be able to manage – and it’s a little more complex than digging a hole to put it in, too. Furthermore, in most Australian jurisdictions, you’ll need to engage with a fully-licensed professional, like the plumbers at Gold Coast Plumbing Experts, to install proper drainage pits – and not just for compliance reasons. Get it wrong, and your DIY stormwater pit could backfire on you and undermine your foundations, cause stormwater blockage and flood water damage, or divert water where it definitely shouldn’t go – like onto your neighbours’ property!
Want to know how a backyard stormwater pit is typically installed? Our super-quick step-by-step stormwater pit installation guide should help:
How to install a stormwater pit
- Step 1. Ensure an adequate foundation and bedding material are in place.
- Step 2. Prepare your stormwater pit for lifting, which may require multiple people or lifting clutches.
- Step 3. Make sure the area around the stormwater pit is clear, as striking any object can cause a lot of damage.
- Step 4. Carefully lift the pit and lay it to rest in its ideal location – adjacent to the downstream stormwater pipe.
- Step 5. Make sure the stormwater pit is sitting perfectly level by using a spirit level.
- Step 6. For a pre-cast pit, mark out the area you will knock out with a small hammer for the pipes. Make sure to not hit the knock-out areas too hard and damage the pit overall, although you may need a sledgehammer for the first impact.
Need a pro to do your stormwater pit installation?
Need professional support for your stormwater pit installation? To ensure your stormwater drainage solutions are ideal for your property and budget, get the real experts to ensure same-day service, upfront pricing, and our 100% lifetime workmanship guaranteed – anywhere in the Gold Coast including Tallebudgera, Burleigh Heads, Palm Beach, Elanora, Currumbin Valley and beyond. How to install a stormwater pit? It couldn’t be easier – call Gold Coast Plumbing Experts today!
Find out more here:
https://goldcoastplumbingexperts.com.au/plumbing-tips/stormwater-pit-installation/